How Do I Export a Table from Clickup to Excel: Quick & Easy Guide
If you’re using ClickUp to organize your projects, you’ve probably wondered how to get your tables out and into Excel for easier analysis or sharing. Exporting a table from ClickUp to Excel is simpler than you might think, and once you know the steps, you’ll save time and avoid the hassle of manual data copying.
Whether you want to create detailed reports or just keep a backup of your task lists, exporting your data can make all the difference. You’ll discover exactly how to export your ClickUp tables directly to Excel with just a few clicks. Plus, you’ll learn some handy tips to make the process smooth and efficient every time you do it. If you haven’t tried ClickUp yet, it’s a powerful AI-driven tool that replaces multiple apps by combining projects, chat, and more — helping you save money and work smarter. Check it out here: ClickUp. Keep reading, and you’ll be exporting your tables like a pro in no time!

Credit: clickup.com
Introduction To Exporting Tables From Clickup To Excel
Exporting tables from ClickUp to Excel helps organize and analyze your data outside ClickUp. This process lets you take your task lists, project details, and other table data into a familiar spreadsheet format. Excel’s tools make it easier to sort, filter, and create reports.
Understanding how ClickUp tables work and why exporting them matters will improve your workflow. Below, we explore ClickUp’s table views and the benefits of exporting to Excel.
Overview Of Clickup And Its Table Views
ClickUp is a powerful platform that combines project management, chat, and AI tools. It replaces many apps by offering all-in-one workspace features.
Tables in ClickUp display your tasks and projects in a structured format. These table views allow easy editing and tracking of task details like status, priority, and due dates.
Key features of ClickUp table views:
- Customizable columns to show relevant task information
- Sorting and filtering options to find data quickly
- Real-time updates across team members
- Ability to switch between list, board, and calendar views
This flexibility makes ClickUp tables ideal for managing complex projects in one place.
Why Exporting Tables To Excel Matters
Exporting tables from ClickUp to Excel offers several important benefits:
- Offline Access: Work on your data without internet connection.
- Advanced Analysis: Use Excel’s formulas, charts, and pivot tables.
- Sharing: Easily share Excel files with people who do not use ClickUp.
- Backup: Keep a safe copy of your project data outside the platform.
- Integration: Import data into other tools that support Excel files.
Exporting saves time and makes project data more versatile. It supports better decision-making and team collaboration by providing a clear view of your information.
Step-by-step Guide To Exporting Tables From Clickup
Exporting tables from ClickUp to Excel is simple and quick. Follow these clear steps to save your project data for offline use or further analysis. This guide covers navigation, export options, format selection, and downloading the file.
Navigating To The Desired List Or Table View
Start by opening ClickUp and signing in to your workspace. Find the project or space containing the table you want to export.
Use the sidebar or search bar to locate the correct list or folder. Click on it to open the detailed view.
Switch to the List or Table view by selecting the view options at the top. The table must be visible to export its data.
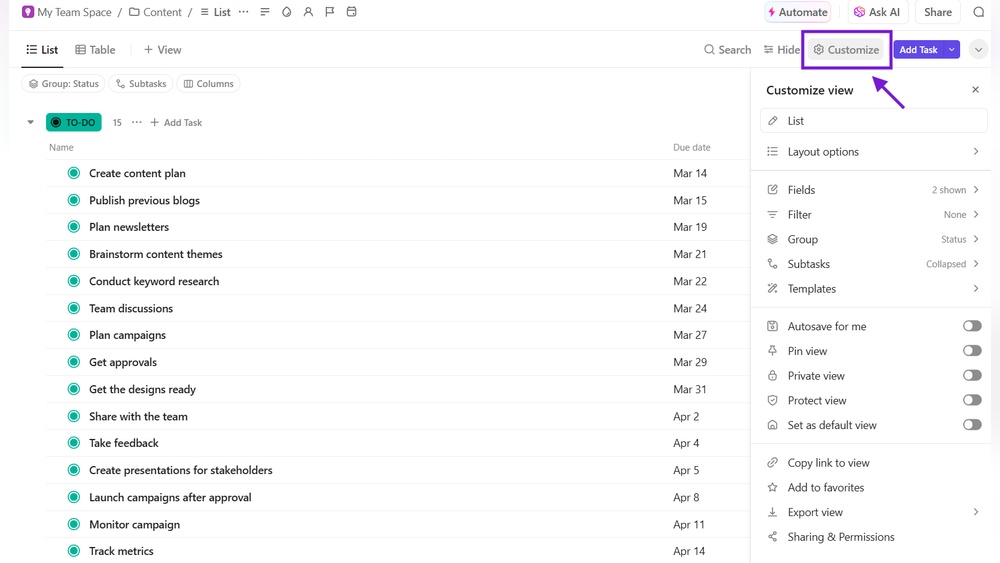
Using The Customize Menu To Access Export Options
Look at the upper-right corner of the list or table view. Find the Customize button (usually represented by a gear icon).
Click Customize to open a dropdown menu. Here, select the Export option to start the export process.
Selecting Export Formats: Excel Vs Csv
After clicking Export, a menu appears with file format options:
- Excel (.xlsx) – Best for full-featured spreadsheets and preserving table structure.
- CSV (.csv) – Simple text format, good for data import into other tools.
Choose Excel to directly download the file compatible with Microsoft Excel.
Downloading And Saving The Exported File
Once the format is selected, ClickUp prepares the export file. This may take a few seconds.
Click the Download button to save the file to your computer.
Choose a folder or location where you can easily find the file later. Rename the file if needed for clarity.
You now have your ClickUp table data saved in Excel format, ready for use offline or sharing.
Key Features Of Clickup’s Export Functionality
ClickUp offers a simple yet powerful export feature for tables and lists. It helps users move data quickly into Excel for further analysis or reporting. The export tool supports various customizations to fit specific needs.
This functionality is designed to save time and keep your data organized. It handles large datasets smoothly and allows control over what information gets exported. These features make exporting data from ClickUp both flexible and efficient.
Customizing Export Content: What To Include
Users can choose exactly which parts of their table to export. Options include:
- Columns and fields: Select specific columns or all columns.
- Task details: Include descriptions, statuses, priorities, and more.
- Attachments and comments: Decide whether to export these or leave them out.
This control ensures the exported Excel file contains only the relevant data. It reduces clutter and makes the file easier to work with.
Time In Status Preferences And Their Importance
ClickUp allows exporting data about how long tasks spend in each status. This feature is valuable for tracking workflow efficiency.
Including Time in Status data helps identify bottlenecks and delays. You can:
- See how long tasks remain in progress or review stages.
- Analyze team performance and task flow speed.
- Make data-driven decisions to improve processes.
Users can toggle this option on or off during export based on their reporting needs.
Handling Large Data Sets Efficiently
ClickUp’s export tool manages large tables without slowing down or crashing. It uses smart loading techniques to process data in chunks.
Key points include:
- Batch processing: Exports data in parts to avoid overload.
- File format options: Choose between Excel (.xlsx) or CSV for compatibility and speed.
- Progress indicators: Shows export progress to keep users informed.
This ensures smooth exports even for extensive project data, saving time and reducing errors.
Pricing And Affordability Of Export Features
ClickUp offers export features that vary by plan, impacting cost and usability. Understanding the pricing helps decide which plan fits your export needs best. Exporting tables to Excel is available but with limits depending on the subscription. Affordability depends on how often and how detailed exports are required.
Export Capabilities In Free Vs Paid Plans
The Free plan allows basic export options:
- Export lists or tables in CSV format.
- Limited export frequency and features.
Paid plans offer enhanced export capabilities:
- Export to Excel (.xlsx) format directly.
- Include custom fields and filters in exports.
- Export more data with fewer restrictions.
The Free plan works for simple exports. Paid plans suit users needing detailed and frequent exports.
When Upgrading Is Needed For Enhanced Export Options
Upgrading becomes necessary if you need:
- Export to Excel files instead of just CSV.
- More control over what data to export.
- Higher export limits for large projects.
- Additional export features like time tracking data.
Advanced export options come with Business and higher-tier plans. These plans support exporting complex tables with all details intact.
Cost-benefit Analysis For Different User Types
| User Type | Export Needs | Recommended Plan | Cost Consideration |
|---|---|---|---|
| Individual or Casual User | Occasional CSV export of small tables | Free Plan | No cost, basic export features |
| Small Team | Frequent exports with filters and custom fields | Unlimited or Business Plan | Moderate cost, better export flexibility |
| Large Business | Complex exports including Excel and time data | Business or Enterprise Plan | Higher cost, full export control and volume |
Choosing the right plan depends on export frequency, data complexity, and budget.
Pros And Cons Of Exporting Tables From Clickup
Exporting tables from ClickUp to Excel offers both benefits and drawbacks. Understanding these helps users decide when and how to export data effectively. This section explores the main advantages and limitations, along with real-world feedback from users.
Advantages: Ease Of Use And Data Flexibility
ClickUp makes exporting tables quite straightforward. Users can export data with just a few clicks, saving time and effort.
- Simple Process: Navigate to the desired table, click Customize, then Export. Choose Excel or CSV format.
- Multiple Formats: Export options include Excel and CSV, offering flexibility for different needs.
- Data Control: Users can select what to export, such as tasks, subtasks, or custom fields.
- Offline Access: Exported files allow offline work and sharing outside ClickUp.
- Easy Integration: Exported Excel files can be used with other software for reporting or analysis.
These features make ClickUp a practical choice for managing and transferring table data.
Limitations: Export Restrictions And Formatting Challenges
Despite its strengths, exporting tables from ClickUp has some limits.
| Limitation | Description | Impact |
|---|---|---|
| Feature Restrictions | Some export options require a Business plan upgrade. | Limits free users from full export capabilities. |
| Formatting Loss | Tables may lose some formatting during export. | Users need to reformat data in Excel. |
| Data Volume Limits | Large tables can be slow to export or may time out. | Exporting big projects can be challenging. |
| Limited Export Customization | Advanced filtering and sorting may not carry over. | Requires manual adjustments post-export. |
User Feedback And Real-world Experiences
Many users find ClickUp’s export feature helpful but sometimes frustrating.
- Users praise the easy export steps and file format options.
- Some report missing custom formatting after export.
- Upgrading to paid plans is common to access full export features.
- Handling large tables often requires patience due to slow exports.
- User forums suggest manual fixes for formatting issues in Excel.
Overall, exporting from ClickUp works well for small to medium data sets. Users should expect some cleanup work after export.

Credit: blog.coupler.io
Ideal Users And Use Cases For Clickup Table Export
Exporting tables from ClickUp to Excel suits different user groups and tasks. This feature helps users handle data outside ClickUp with ease. Exporting tables simplifies sharing, analyzing, and organizing project data. Below are key users and scenarios for this export function.
Project Managers And Team Leads
Project managers and team leads benefit from exporting tables to Excel for better project oversight.
- Track task progress and deadlines offline.
- Create custom reports tailored to stakeholders.
- Share task lists with clients who don’t use ClickUp.
- Analyze team performance with Excel’s advanced tools.
This export helps managers keep control of projects and communicate clearly with their teams.
Data Analysts And Reporting Specialists
Data analysts and reporting specialists use ClickUp exports to dive deeper into project data.
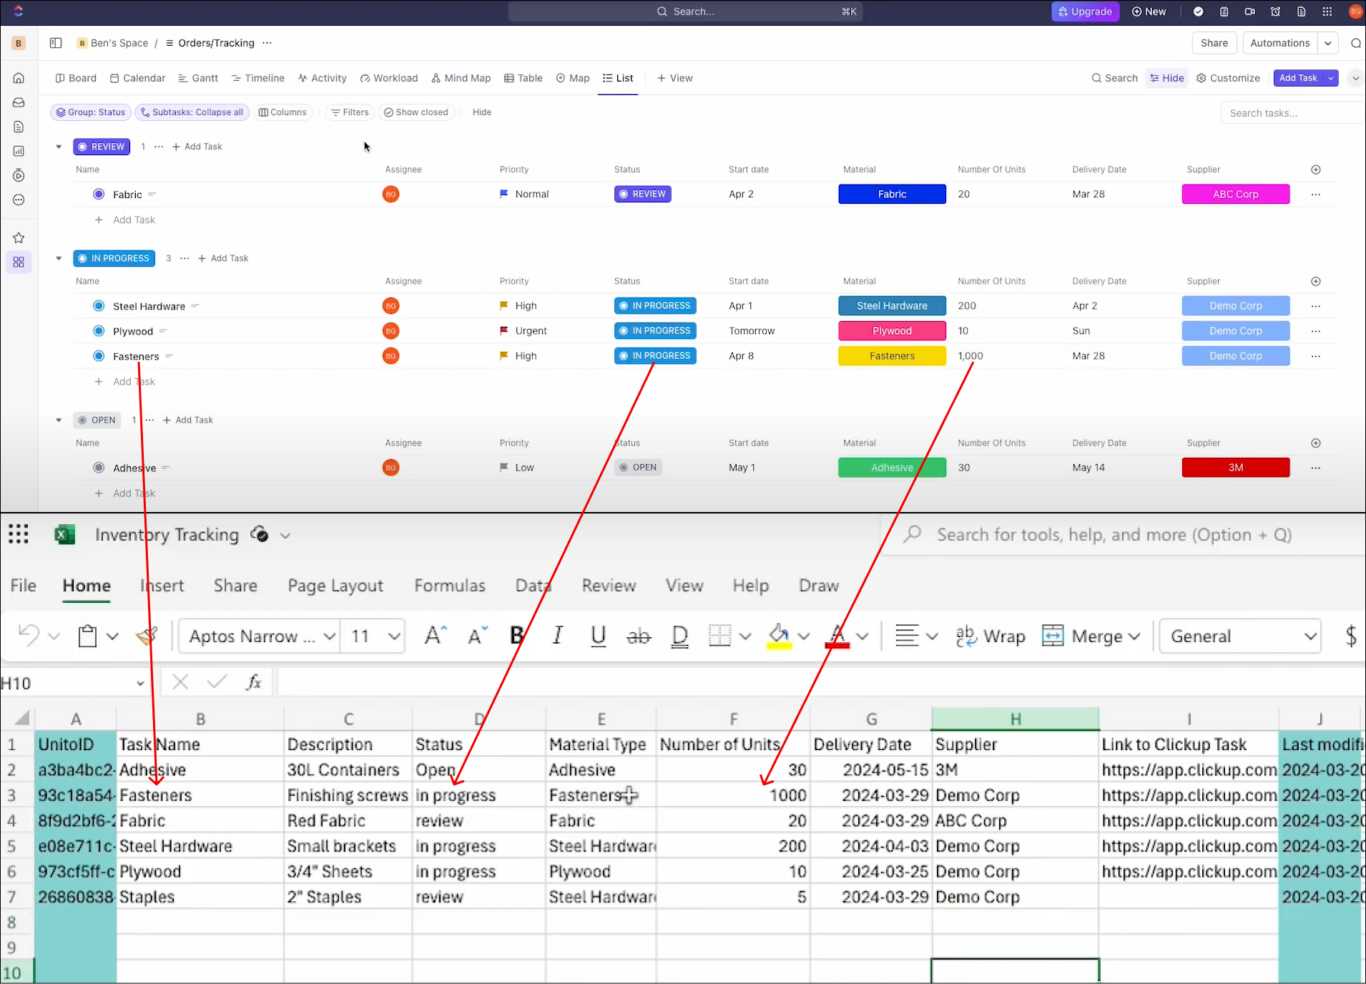
- Import ClickUp tables into Excel for detailed analysis.
- Apply formulas and pivot tables to identify trends.
- Combine ClickUp data with other sources for comprehensive reports.
- Automate report generation by linking Excel with other tools.
Exporting tables allows analysts to transform raw task data into meaningful insights.
Scenarios Requiring Offline Data Manipulation
Some situations need working with project data without internet access or inside specialized software.
- Prepare presentations or reports in locations without internet.
- Perform data cleaning and formatting using Excel’s functions.
- Backup project data outside ClickUp to avoid data loss.
- Share data with team members who prefer Excel over ClickUp.
Exporting tables to Excel supports offline work and flexible data handling.
Tips And Best Practices For Exporting Tables To Excel
Exporting tables from ClickUp to Excel can streamline your workflow and improve data analysis. Following key tips ensures your exported tables stay neat and easy to work with. Proper preparation, quick troubleshooting, and smart use of Excel features enhance your experience.
Preparing Your Table For A Clean Export
Start by organizing your table in ClickUp. Remove any unnecessary columns or rows to keep the data relevant. Use clear and simple headers for each column to avoid confusion in Excel.
Check that all cells contain consistent data types. Mixing numbers, text, and dates in one column can cause issues after export. Sort or filter your data if needed to export only what matters most.
- Clean up empty rows and columns to avoid clutter.
- Use consistent naming conventions for easier tracking.
- Verify data formats like dates and numbers before export.
Troubleshooting Common Export Issues
Occasionally, exports may not appear as expected. Blank columns or missing data are common problems. Confirm you have selected the right table or list view before exporting.
If the file format is incorrect, reselect Excel (.xlsx) or CSV as needed. Some exports may require refreshing your ClickUp page to fix glitches.
| Issue | Cause | Solution |
|---|---|---|
| Blank columns in Excel | Hidden or empty columns in ClickUp | Remove empty columns before export |
| Data missing | Wrong list or filter applied | Check filters and export from correct view |
| File won’t open | Wrong file format or corruption | Choose Excel (.xlsx) and retry export |
Leveraging Excel Features Post-export
After exporting, use Excel tools to make your data more useful. Start with formatting cells to match their data types. Use sorting and filtering to focus on key details.
PivotTables can summarize large data sets quickly. Conditional formatting highlights important numbers or trends. Charts help visualize the data for reports or presentations.
- Format cells for dates, numbers, or text.
- Apply filters to narrow down data views.
- Create PivotTables to summarize information.
- Use conditional formatting to spot trends.
- Build charts for visual data insights.
Using these tips can save time and improve accuracy when working with ClickUp exports in Excel.
Conclusion: Maximizing Efficiency With Clickup Table Exports
Exporting tables from ClickUp to Excel helps save time and organize data clearly. This function supports better project tracking and reporting.
Understanding how to export tables efficiently allows users to work smarter. It turns complex project data into easy-to-manage spreadsheets.
Summary Of Benefits And Key Takeaways
- Easy Data Management: Exporting tables lets you handle large data sets outside ClickUp.
- Improved Reporting: Excel files make sharing and analyzing project details simpler.
- Flexible Formats: Choose between Excel (.xlsx) or CSV files based on your needs.
- Customizable Export: Select specific columns, statuses, or dates for tailored reports.
- Quick Access: Export directly from List or Table views with just a few clicks.
These features bring clarity and structure to complex project information. They help teams stay aligned and focused.
Encouraging Effective Use Of Export Functions
Follow these tips to get the most from ClickUp’s export tools:
- Prepare Your Table: Filter and sort tasks to export only relevant data.
- Use Customize Options: Click Customize in the upper-right corner to pick columns and fields.
- Choose Format Wisely: Excel for detailed analysis, CSV for quick data transfers.
- Check Export Settings: Include time in status or other preferences as needed.
- Review Exported File: Open the Excel file immediately to confirm data accuracy.
Practice exporting regularly to build confidence and speed. Clear data exports reduce errors and improve teamwork.
Credit: unito.io
Frequently Asked Questions
How Do I Export A Table From Clickup?
To export a table from ClickUp, open the desired List or Table view. Click “Customize” at the top right, then select “Export. ” Choose the file format (Excel or CSV) and click “Download” to save the table to your device.
How Do I Export A Table Into Excel?
Right-click any table cell and select Export Table. Choose Export to Excel or CSV. Click Download to save the file.
How To Convert Data Table To Excel?
To convert a data table to Excel, export the table as an Excel or CSV file. Open or import this file in Excel.
Can You Download From Clickup?
Yes, you can download from ClickUp by exporting your List or Table views. Click “Customize,” then “Export,” choose the file format, and click “Download. “
Conclusion
Exporting a table from ClickUp to Excel is simple and quick. Follow the easy steps to get your data in Excel format. This helps you analyze and share information more effectively. Using ClickUp streamlines your work and keeps everything organized. For more details and tools, check out ClickUp. Save time by combining all your apps and projects in one place. Try it and see how smooth managing your tasks can be.